Like me, for every front-end developer, backend development environment setup looks like absolute rocket science and a hard-to-nail task. When I moved from standard HTML, CSS, and JavaScript files to React, I then understood what the front-end setup looks like, and that helped me a lot while building the backend setup.
Let’s jump into VS Code and let’s get our hands dirty!!!
1. package.json
Once we create a folder and open it in VS Code, the very first step is to go ahead and create a package.json file.
Need the below-mentioned command to run in the terminal to create package.json:
$ npm initThis command asks questions as follows:
package name: React Backend
version: 1.0.0 (mention any versions of your app)description: React, Node.js project (project description)
entrypoint: server.js (This will be the entry door for your backend, like index.html for frontend)
test command: (test command if you have any, or can be kept blank)
git repository: (git repository of the project, or can be blank)
Keywords: React, Node, blogspage (any of the keywords related to the project )
author: Ravindra (The lead developer or programmer of the project)
licence: ISC (licence info if you have any)
There is also a shortcut to skip all the above questions and create a package.json with a default value.
$ npm init -yThe above command will create a package.json file with all default values.
2. Create a folder structure
If you are willing to write all the code in one file, you could probably do that, but your mind will blow after a few lines of code since everything is mixed.
Hence, good programming practice involves structuring the code across multiple files and folders to increase the readability and maintainability of the code.
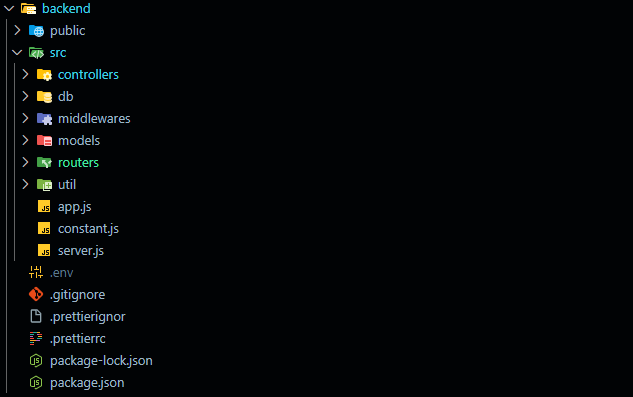
Create a folder structure as below. It’s not the final blueprint of folder structure, as you keep adding functionality in your code, you probably need to create more folders and files.

- Root folder – In the above image, the backend is the root folder that you created first and then launched in VSCode.
- public – public folder to keep the publicly available assets and temporary files.
- src – This folder will contain all your source code.
- Controllers – Write all the controllers in this folder, which will handle the main actions.
- db – It’s always good to separate the database connection-related code in a separate folder/ file.
- middlewares – Write all your middlewares here and integrate them later with app.use();
- models – In order to work with the MongoDB database, we need the mongoose to create a database Schema and model.
- routers – Create a separate route for each controller.
- util – If you have some repetitive functions that will be called everywhere, create that function here. eg. ApiResponse formatter, ApiError formatter etc
3. Dot files
Once we have created a folder structure, let’s dive in and create files.
We would need to create the following files at initial setup:
.env
Environmental variables are key points to run the application. Environmental variables could be a security threat to compromise any of the applications. Hence, we have to keep them secured.
The .env file looks like this:
PORT=8000
ORIGIN=http://localhost:5173
MONGO_DB_URL=mongodb+srv://<db_user>:<db_password>@cluster-pract.ehws0hg.mongodb.net
.gitignore
While we are pushing the production-ready code on GitHub, we have to skip some files/folders from being pushed on git, considering the performance and security.
We can use the online tools as well to create the .gitignore file.
Tool link – https://mrkandreev.name/snippets/gitignore-generator/
.pretttierrc
When a large project and multiple team members are working on the same project, it’s necessary to maintain a consistent code format across all developers.
A prettier configuration file helps to create that consistent code format.
The .prettierrc file looks like this:
{
"singleQuote": false,
"bracketSpacing": true,
"tabWidth": 2,
"semi": true,
"trailingComma": "es5"
}
.prettierignore
Prettier will format all code files, but we still have some files that we don’t want to be formatted by Prettier. We will mention all these file names inside this .prettierignore file.
The .prettierignore file looks like this:
/.vscode
/node_modules
./dist
*.env
.env.*
4. Install the packages
Backend development involves multiple dependencies and packages to install and work on.
- install express
- install dotenv
- install prettier
- install nodemon (optional)
- install mongoose
$ npm install express
$ npm install dotenv
$ npm install prettier
$ npm install mongoose
5. Important backend files
Great, you have been reading all, and by this time, you have done so many things for the backend development environment setup. We have some important files that need to be created inside the src folder.
The files are as follows:
app.js
We will create an Express server here and attach most middleware to the Express server in the app.js file.
import express from "express";

//create app
const app = express();

app.use(express.json());

app.use(express.urlencoded({extended:true}));

export {app};
server.js
This file is the main entry point of your backend application. We run the backend server from server.js.
Apart from running the server, all other tasks like routing, registering middlewares, initializing database connection, etc, will be taken care of from this file.
The basic server.js file is below
import {app} from './app.js';
import dotenv from 'dotenv';
import { connectDB } from './db/index.js';
import { errorhandler } from './middlewares/errorHandler.middleware.js';
import {addEmployeeRouter} from './routers/employee.router.js';

dotenv.config();

const PORT = process.env.PORT || 3000;

//router

app.use("/api/employee", addEmployeeRouter);

connectDB()
.then(()=>{
    app.listen(PORT, ()=>{
console.log(`Server Started on Port ${PORT}`);
    })
    app.on("error", (e)=>{console.error(e)})
})
.catch((e)=>{
  console.error("Error while connecting the database")
})

app.use(errorhandler);
constant.js
This file will be used specifically to declare the constant values, which we don’t want to change throughout the code.
The basic constant.js file is below:
export const DB_NAME = "employeeDB";Final edit and check in package.json
We have multiple functionalities available in the package.json file to initiate. One important configuration is to mention which JavaScript module we are using for development.
// common JS module
"type":"commonjs"

//ECMAScript module
"type":"module"
Here, the default selected module is commonjs. We are using import/ export syntax, so we should change that to “type”: “module”.
Most of the time, developers want the ongoing changes in the backend without restarting the server to implement changes.
The -watch flag in NodeJS server instructs the server to implement new changes without restarting.
The package.json file changes as follows:
"dev": "node --watch src/server.js"If you have a big project, you can install the nodemon package, which will ensure your server restarts automatically whenever any changes occur.
$ npm install nodemonThere would be some additional helpful functions that you can create to make your life easier.
Congratulations! You have done the initial setup of your project. You can start writing the controllers, modules, and routers to make your backend functional.
Oh! We’ve reached the end of the article. I hope you’ve gained a solid understanding of how to do initial setup for backend development. 😃
🚀 Follow me on Twitter for more tips and updates: @ravindra5k
💡 Check out my other articles:
- Everything You Need to Know About JavaScript Functions – Beginner to Pro
- 10 Tips to Write CSS Faster and More Efficiently for New Web Developers
- React Fiber VS Virtual DOM: How React Optimizes UI Updates
- Master the DOM and APIs by Building a Currency Converter App
- JavaScript Data Types in Web Technology for Begginers
- How to Create an Image Gallery with Filter Buttons in Just 10 Minutes!
- Create Website Slider with HTML, CSS & Swiper.js!
In JavaScript, there are mainly two types of modules. 1) CommonJS(CJS) 2) ES Module (ESM /ES6 Modules).
We can create a .gitignore file in the home directory mentioning the list of files and directories (folders) that we don’t want to push to GitHub.
Sometimes it depends on which module system/ runtime you are using (Node.js). In general, in a Node.js project, there are two places where the entry file name is mentioned. 1) “main”: “src/server.js” 2) “script”: { “start”: “node src/server.js” }
Every deployment server will have the option to configure the variables on the server hosting platform itself, which will be used by your backend server at runtime.
