Every front-end developer is curious to know how to connect a React app to a MongoDB database easily. Once you start learning about the backend and database connectivity, you will get overwhelmed seeing the number of dependency files, and we need to maintain all of them in a well-structured manner; otherwise, even a simple backend will look like rocket science. 😄
A database is the backbone of any application, which is runnig on the internet. If you are a front-end developer and are looking to learn and understand the database and backend, this post is for you.
I have divided the whole process into three parts.
- Front-end (React)
- Back-end (Express JS)
- Database (MongoDB)
Let’s jump into each part.
Front-end development for React
You can connect any front-end with a backend, even your simple HTML page. As of now, we will talk about the ReactJS front-end.
A React component to handle the data.
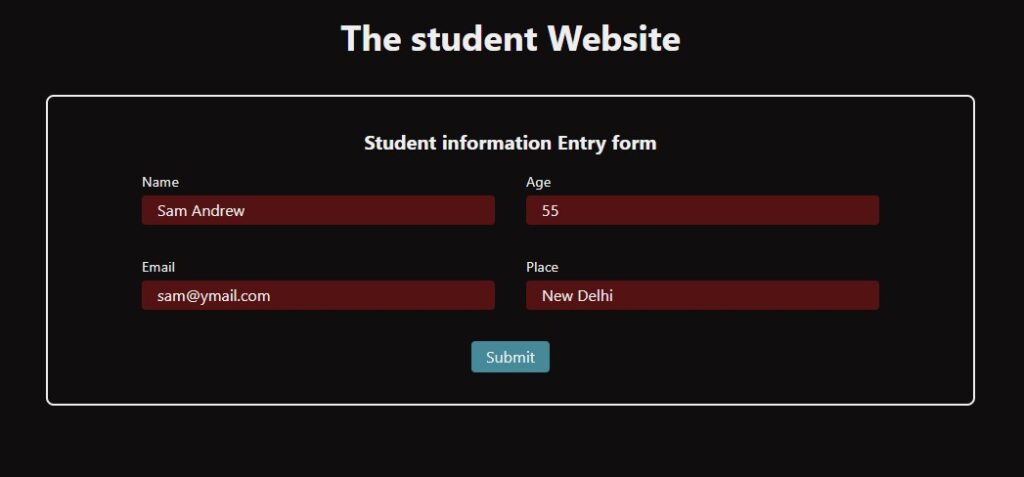
We need a front-end where we can enter the data, and it will get saved in the database. Let’s create a simple form that will accept the name, age, and email of the student.
Let’s create a sample front-end that accepts a few information as below.
Since we have created a React component to accept the data from the user, after accepting the data from the user, we need to prepare a backend connection.
Handling forms in React is so much fun. I have used the FormData object to handle the form inputs.
App.jsx
import React, { useEffect, useState } from "react";
import InputData from "./InputData";
import { studentsForm } from "./API/studentForm.api.js";

function App() {
  const [showError, setShowError] = useState(null);
  const [successMessage, setSuccessMessage] = useState(null);

  const onSubmitForm = (e) => {
    e.preventDefault();
    const formData = new FormData(e.target);
    const data = {
      name: formData.get("name"),
      age: formData.get("age"),
      email: formData.get("email"),
      place: formData.get("place"),
    };
    setTimeout(async () => {
      const result = await studentsForm(data);
      if (result.success) {
        setSuccessMessage(result.message);
        e.target.reset();
      }
      else {
        setShowError(result.error);
      }
    }, 2000);
  };

  useEffect(() => {
    if (successMessage) {
      const timer = setTimeout(() => setSuccessMessage(null), 2000);
      return () => clearTimeout(timer);
    }
    if (showError) {
      const timer = setTimeout(() => setShowError(null), 2000);
      return () => clearTimeout(timer);
    }
  }, [showError, successMessage]);

  return (
    <div className="relative">
      {(showError || successMessage) && <p className ={showError ? "errorMessage" : "successMessage"}>{showError || successMessage}</p> }
      <h1>The student Website</h1>
      <div className="form-section">
        <h2>Student information Entry form</h2>
        <form onSubmit={onSubmitForm} className="form">
          <div className="input-section">
            <InputData name="name" label="Name" type="text" required />
            <InputData name="age" label="Age" type="number" required />
            <InputData name="email" label="Email" type="email" required />
            <InputData name="place" label="Place" type="text" required />
          </div>
          <button className="submit-btn">Submit</button>
        </form>
      </div>
    </div>
  );
}

export default App;
InputData.jsx
import React from "react";

function InputData({name, label, type, ...props}) {
  return (
    <div className="input-block">
      <label htmlFor="name">{label}</label>
      <input type={type} name={name} {...props} />
    </div>
  );
}

export default InputData;
API connection handler – Connect a React App to MongoDB Database
Let’s create a function to talk to the backend API endpoint. At the end point, there will be a controller that implements the backend logic
I have created a very simple function to create the HTTP request with the help of axios; we can also use fetch.
import axios from "axios";
const studentsForm = async (submittedData) => {
  try {
    const URI = "http://localhost:8000";
    const response = await axios.post(`${URI}/api/student/save`, submittedData);
    return {
      success: true,
      message: response.data.message,
      status: response.status,
    };
  } catch (error) {
    const errorMessage = error.response.data.error || "Something went wrong";
    return {
      success: false,
      error: errorMessage,
      status: error.response?.status || 500,
    };
  }
};

export { studentsForm };
Here, my API endpoint is http://localhost:8000/api/student/save. The above-mentioned example function accepts the submittedData as an argument.
Perfect! We have pretty much done front-end development. Let’s work on the database.
2. MongoDB Database
MongoDB is a NoSQL document-oriented database. Data is stored in BSON(Binary JSON) format and not in row-column format like a relational database. Since we can nest objects and arrays inside the documents, most developers prefer to choose MongoDB.
Steps to create a MongoDB cluster
- Go to the MongoSB Atlas. Click here to open the link.
- Create a Project.
- Create a Cluster. Here you can choose a free tier if it’s just for testing or higher, depending on your project needs.
- Create a Database User.
- Go to Security options – Database Access
- Click Add New Database User.
- Provide a username and password.
- Choose built-in Role -> Atlas Admin (or just Read and Write to any Database).
- Hit the save button.
- Set Network Access
- Go to Security -> Network Access.
- Add your IP:
- Provide an IP address of the machine from where you will access the DB (recommended for security)
- Or set 0.0.0.0/0, and the DB will be accessed through all IP addresses with credentials.
- Delete the old /unwanted IP, if any.
- Click on save.
- Verify 2 important Security Settings.
- Network Access -> Show your IP 0.0.0.0/0
- Database Access -> Here, we should have a user created with R/W access.
- Get the Connection String
- On the left panel, click on the cluster and then click on the option connect.
- Choose Connect with Compass(or Connect your application if you are using Node.js)
- Copy the connection string.
- Connection string will look like – mongodb+srv://<username>:<password>@cluster0.abcd.mongodb.net/
- Done
Perfect! By following the above steps, we have created a cluster and set the user to access the cluster. Later, we will create a DB and we will perform the operations on it.
Build a Backend in Express
Let’s go ahead and set up the backend. Please read my article on setting up the backend before moving further on connect a React App to MongoDB Database.
Express Backend initial setup and files/folder structure
The minimum setup you can do.
As mentioned in the article, you can follow all the steps to create a professional backend setup.
If you just want to perform the DB operation and are not bothered much about the industry-standard backend setup, then follow the minimum setup.
- Create a package -> npm init -y
- Create a folder structure -> Create a src folder and inside that create folders as controller, DB, models, routers
- Create a server.js file inside the src folder and change the main file path accordingly in package.json.
- Edit package.json as below:
- “dev”: “node –watch src/server.js”
- “type”: “module”
- Install the dependencies.
- npm install mongoose express cors dotenv
- Create a .env and .gitignore file in the root directory. (same directly where package.json is present)
The quick setup of the Express backend will look as below:

Database connectivity – connect the MongoDB Database to Express
Creating a database connection is relatively simple. As shown in the image above, we have created a folder called ‘DB’.
Let’s create index.js inside the DB folder to write the DB connection.
What is all needed to establish the Database connection?
- connection string, save this in .env. eg. MONGO_URL=mongodb+srv://<db_user>:<db_password>@cluster0.lhbqtbw.mongodb.net
- Database User and Password, save this in .env.
- Make sure mongoose, dotenv, and express are installed.
- Provide a database name.
It’s very simple, only 1 line of code to connect to the Database.
const connectionStatus = await mongoose.connect(`${DB_URL}/blogspageDB`);In the above code, blogspageDB is a database name that is provided while connecting database.
Before we provide the DB_URL to mongoose.connect we should make sure that <db_user> and <db_passowrd> replaced with actual database user and password.
The complete DB connection index.js file is below:
import mongoose from "mongoose";
import dotenv from "dotenv";
dotenv.config();

async function connectDB() {
  try {
    const DB_URL = process.env.MONGO_URL.replace(
      "<db_user>",
      process.env.MONGO_USER
    ).replace(
      "<db_password>",
      process.env.MONGO_PASSWORD
    );
    const dbConnection= await mongoose.connect(`${DB_URL}/blogspageDB`);
    console.log("Succesfully Connected!!", dbConnection.connections[0].host);

  } catch (error) {
    console.error("Error occured in DB connection!", error);
    process.exit(1)
  }
}
export { connectDB };
Once we have connectDB() ready, we are good to call that function inside the server.js and upon successful connection to the database, our server will start with the provided PORT.
Below is the code for the server.js.
import express from "express";
import { connectDB } from "./DB/index.js";
import dotenv from "dotenv";
import cors from "cors";
import studentsRouter from "./routers/students.route.js";
dotenv.config();
const app = express();

const PORT = process.env.PORT;

app.use(express.json());
app.use(cors("http://localhost:5173", { credentials: true }));

app.use("/api/student", studentsRouter);

const startServer = async () => {
  try {
    const conn = await connectDB();
    app.listen(PORT, () => {
      console.log("Server started succesfully on port 8000");
    });
  } catch (error) {
    console.error(error);
  }
};
startServer();
Now, let’s go ahead and run the backend with “npm run dev”, and you will see the backend consoles on the terminal as below:

Congratulations 🎉, you have successfully connected to the database and started the backend server.
Create a mongoose Schema and Model
Since we are working on a MongoDB database with Mongoose, we need to create a schema to define the structure of the data. The benefit of a schema is that it creates consistency and applies validation before saving the data into the database.
Let’s go ahead and create a mongoose model file studentForm.model.js, under the models folder.
Since we have only 4 input fields, let’s define the structure of the data for the same.
The mongoose studentForm.model.js file is below:
import mongoose from "mongoose";

const studentSchema = new mongoose.Schema({
    name: {
        type:String,
        required:true
    },
    age:{
        type: Number,
        required:true
    },
    email:{
        type:String,
        required:true,
        unique:true
    },
    place:{
        type:String,
        required:true
    }
},{timestamps:true});

export const Student = mongoose.model("Student",studentSchema);
Write a controller to save student data in the database
In backend development controller plays a main logic role. This controller will later be called in the router. Our controller logic is very simple.
- Pull the data from the request stream, which is the data that the user has passed in the body.
- Store the data in variables.
- Perform the validations on the data.
- If validation is successful, then save the data in the DB with the create function.
- Check for the response; if the response is not successful, then throw an error or send the response back to the client.
Controller logic is as below:
import { Student } from "../models/studentForm.model.js";

const studentsEntry = async (req, res) => {
  try {
    const body = req.body || {};
    const { name, age, email, place } = body;
    if (!name || !age || !email || !place) {
       return res.status(400).json({ error: "All input required!!" });
    }
    const emailRegex = /^[^\s@]+@[^\s@]+\.[^\s@]+$/;
    if (!emailRegex.test(email)) {
      return res.status(400).json({ error: "Oops, email is not in correct format!!" });
    }

    const response = await Student.create({ name, age, email, place});
    if (!response) {
      return res.status(500).json({ error: "Issue while saving data" });
    }
    res.status(201).json({message:"Data added to DB successfully!"}, response);
  } catch (error) {
    console.error("Error occured", error);
    return res.status(500).json({ error: "Internal server error" })
  }
};

export { studentsEntry };
Create a route and add necessary middlewares
Let’s create a route in the student.route.js file. We are looking to create a final route as /api/student/save
student.router.js file is as below:
import express from "express";
import { studentsEntry } from "../controllers/studentsEntry.controller.js";

const router = express.Router();

router.post("/save",studentsEntry);

export default router;
The following middlewares are needed for the smooth execution of this app.
- express.json() – We mentioned express to parse the incoming request with JSON payloads.
- cors – Since we send requests to the backend api from different origins (React).
We need to add middleware and routers in the server.js file as below:
//Here logic to connect DB and start server

startServer();
app.use(express.json())
app.use(cors("http://localhost:5173", { credentials:true}));
app.use("/api/student",studentsRouter);
Test the application
Alright! So the application is ready, and let’s give it a try. Please enter the details on the React front-end form which we have created, and as soon as you hit the submit button, the message will pop up” Data added to DB successfully!”
Complete code on Github – https://github.com/JScriptProject/blogspage-students_data_fullstack
Oh! We’ve reached the end of the article. I hope you’ve gained a solid understanding of connect a React App to MongoDB Database. 😃
🚀 Follow me on Twitter for more tips and updates: @ravindra5k
💡 Check out my other articles:
- Everything You Need to Know About JavaScript Functions – Beginner to Pro
- 10 Tips to Write CSS Faster and More Efficiently for New Web Developers
- React Fiber VS Virtual DOM: How React Optimizes UI Updates
- Master the DOM and APIs by Building a Currency Converter App
- Quick and Easy Backend Development Environment Setup
- How to Create an Image Gallery with Filter Buttons in Just 10 Minutes!
- Create Website Slider with HTML, CSS & Swiper.js!
